
Course Mapping for Online Social Work Courses
 This post was written by Denise Krause, clinical instructor at the School of Social Work at the University at Buffalo, and edited by Nancy J. Smyth, Melanie Sage, and myself. It will be included in our forthcoming book, Teaching Social Work with Digital Technology, to be published by CSWE Press in 2018.
Course mapping is considered a best practice when designing any course content for online delivery via a learning management system (LMS) (Jacobs, 2004; Quality Matters, n.d.; Wiggins & McTighe, 2005). need date; more references). It is the process of aligning the course objectives with module objectives and all learning activities in a course to create a visual overview of the course. In turn, these documents can be used to create a student roadmap, which provide clear directions on how students can navigate online course content in a consistent and methodical way. This helps to ensure that student will avoid missing instructions assignments. Roadmaps can be used in any type of online course from a web-enhanced offering to a fully online class. What goes into a student road map will vary by instructor and/or institution, but key topics include learning objectives, course content, assignments or learning tasks, and assessments.
An instructor can create a roadmap for an entire course and/or create roadmaps for individual learning modules. How the road map is ultimately formatted and looks to students will depend on factors such as your institution’s learning management system, if your department or school has pre-designed course shells, and/or if your institutions uses instructional designers to upload content into the course shell.
The best way to start a roadmap is to create it in word processing document or spreadsheet before putting content into an LMS. This can be very helpful in conceptualizing what you want students to learn and how you plan to assess their learning. While there is no one right way to design a roadmap, typically you will include the following information:
- Brief Description of the Module or Course
- Learning Objectives for the Module or Course
- Student Learning Tasks for the Module or Course
- Introduction to the Module of Course Content
- Reflections for students to consider as they progress through the Module or Course
- Assessment
- Additional resources or tips for further study
- Take-Away Points
This worksheet provides a table in a word document that an instructor can be used to build a roadmap for an entire course, from start to finish. An educator can complete this spreadsheet first and then use it to expand directions, assignments or other information that will ultimately go into the course in the learning management system.
In the following figures, we offer a visualization of how a module roadmap might look to the students, who can navigate the roadmap by clicking through the different layers. Figure 1 shows three layers to a module which includes the overall module content and tasks, the next layer leads to individual segments or components of the module, and the final layer links to specific activities, external sites, and/or assignments. By using hyperlinks within the LMS, students can click on the different layers of the module roadmap to access the content.
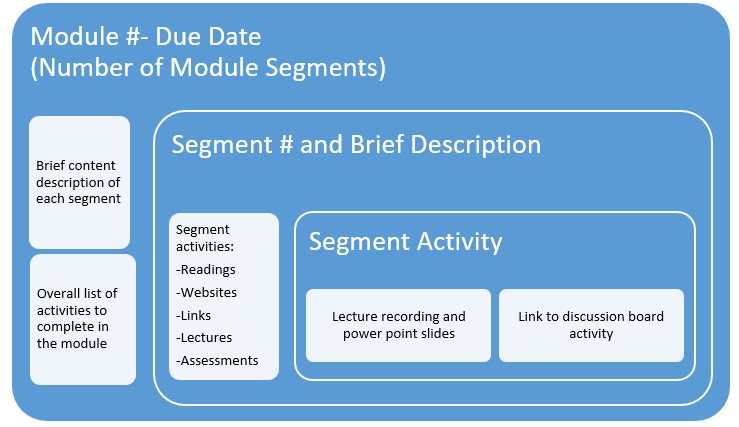
Figure 1 – Layered View of a Module Roadmap
Figure 2 is a detailed glance of the first layer of the module. The student sees the module number, number of module segments, and due date. They also will read the titles of the segments and have a list of all module-related activities.
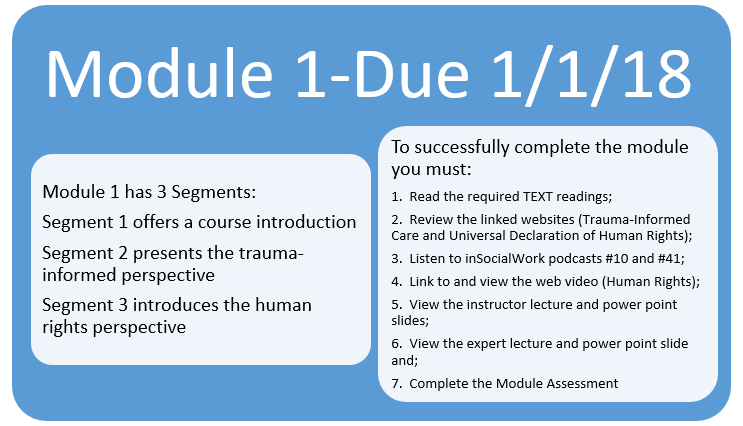
Figure 2 – First Layer of the Learning Module
Clicking into the hyperlinks in one segment of the learning module, as seen in Figure 3, provides the students with the specific requirements and links where appropriate for completing Segment 2 of Learning Module 1.
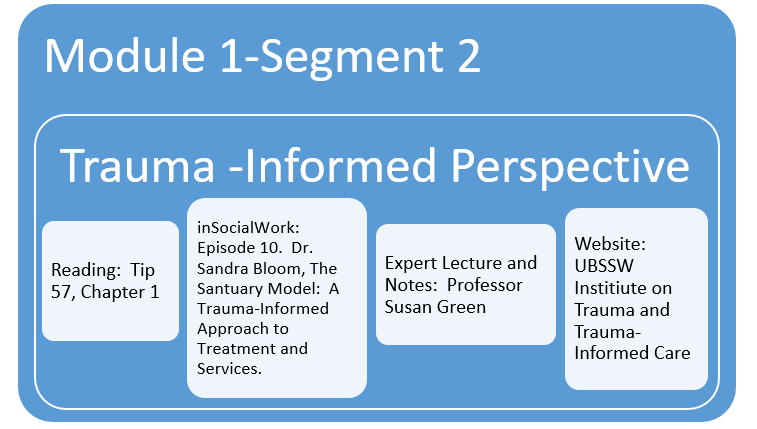
Figure 3 – Second Layer of the Learning Module
Finally, in Figure 4, the student can see the module’s assessment activities.
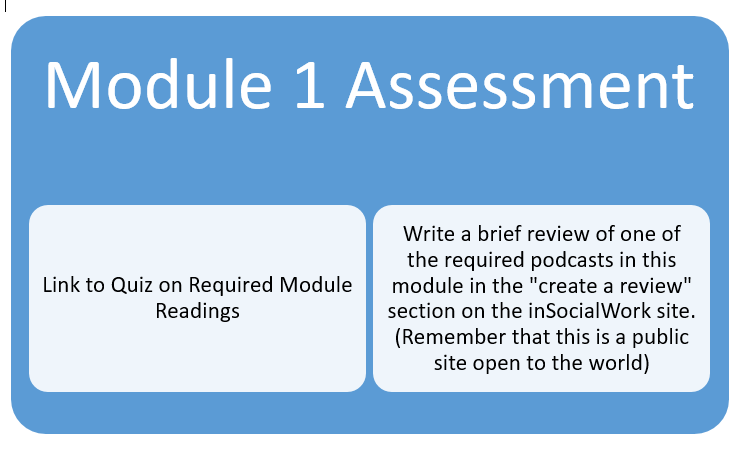
Figure 4 – Third Layer of the Learning Module
An instructor can choose when to release module and segment content to students using adaptive release tools within their learning management system. Making all content available in the beginning of the semester gives students choice and allows them to “jump ahead” to areas they have particular interest in. However, pedagogy might dictate that content be release in a sequential manner so students can develop mastery on the content before moving on to another topic.
Figure 5 shows an instructor planning spreadsheet that includes columns for content, readings, ancillary materials, assignments, manner of content delivery including technology utilized, and anything else significant to the design and delivery of a learning component. The instructor’s planning grid can later be converted to a roadmap.
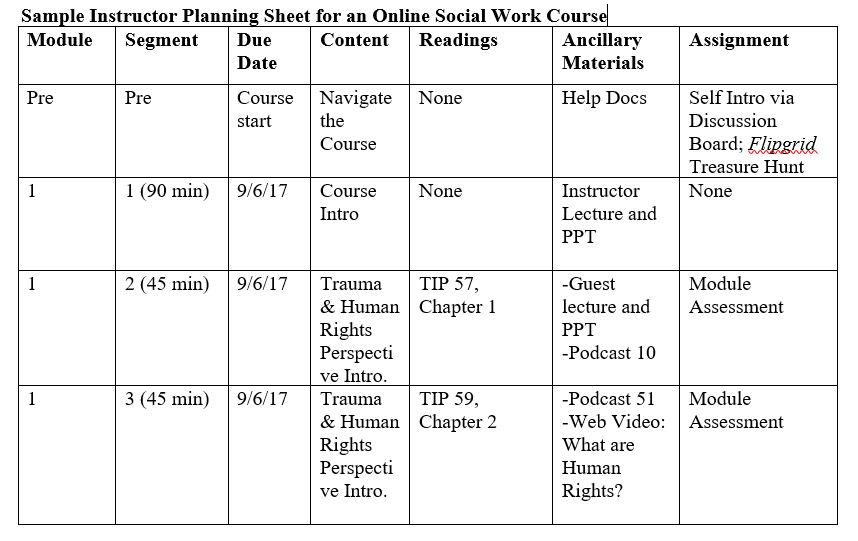
Figure 5 – Instructor Planning Sheet
Once you outline the modules, the next step is to create detailed instructions that can be added to the LMS for students. Here is an example of how those instructions might look:
Course Module Roadmap
This roadmap is to guide you as you progress through the course. All the tasks listed in the roadmap should be performed outside of class. Unless an exercise states that the instructor will collect it for grading, then the exercise is solely for your learning purposes. Some exercises ask you to partner with someone. This can be someone who is taking the course, or someone who is not (a friend, family member, or coworker). The module tasks should always be completed before moving on to the next module. In the case of the in-class modules, you should complete the tasks before coming to class. As two modules are covered in the in-class sessions, you should complete the work for both modules.
Then, the roadmap needs to be formatted and uploaded into the LMS. A roadmap can include embedded hyperlinks to videos, readings, and course assignments. Additionally, an instructor may prefer to record a video or audio of the module instructions along with the written directions. A road map should be created for each learning module within the course. The following is an example of how a roadmap might look for students (only one module shown):
MODULE 1
Module 1 introduces the learner to the course and to the historical context for solution focused practice. Module 1 has an in-class component. The online portion of the module includes text readings, online video viewing, at-home practice exercise and a module assessment. These should be completed prior to the first in-class meeting.
LEARNING OBJECTIVES
- To recognize the difference between problem-solving and solution-building interviewing questions.
- To explain the way in which solution-focused interviewing procedures were developed.
- To state the stages of solution building.
- To identify the applications of solution-focused practices at different practice levels; namely, individual, group, and organization practice.
STUDENT TASKS
- Read De Jong and Kim Berg (course textbook), Chapters 1 & 14 (Readings 1 & 4)
- Watch the following videos: “IAMFC Distinguished Speaker Series: Solution Focused Brief Treatment, Over the Hump and I Want to Want to I”
- Complete Exercise 1-1
- Complete Module 1 assessment
VIDEO INTRODUCTIONS
- “IAMFC Distinguished Speaker Series: Solution Focused Brief Treatment”
This video is an introduction to Solution Focused practice given by Insoo Kim Berg at a conference sponsored by the International Association of Marriage and Family Counseling. This is will compliment your reading by reinforcing the message of what solution focused work is about. - “Over the Hump”
This clip is a debriefing between the family and Steve de Shazer. The couple and their 5 children had just had a session with Insoo Kim Berg. Steve de Shazer is asking them about their experience with solution focused practice. Pay attention to their comments about the miracle question, their affect and their comments about experiences with other professionals. - “I Want to Want to I”
This clip is a beginning interview between Steve de Shazer and Simon. Simon was referred to Steve by his mother who is worried about Simon’s “depressed” affect since his paralysis that resulted from an accident 6 months prior. The clip begins at the start of the session.Questions to consider:
– How does the worker go about asking for the client’s goals?
– How does the worker use relational questions to assist with goals?
– What was helpful about this?
– What would you say to Simon after he rated himself a zero?
EXERCISE 1-1
- Choose a partner for this exercise
- For 10 minutes, have your partner tell you about something that was a problem for him or her this past week. Your task is to get as much detail as possible about the problem so that you can make an assessment of how serious the problem is.
- For the next 10 minutes, have your partner tell you about something that went well this past week. Your task is to get as much detail as possible about what went well and how it happened; that is, who did what to make the good event happen.
- Talk your partner about the differences in these two interactions. What did they notice about themselves and about you? What did you notice about you?
References:
Jacobs, H. H. (Ed.). (2004). Getting results with curriculum mapping. Alexandria, VA: Association for Supervision & Curriculum.
Quality Matters. (n.d.). Quality Matters Homepage. Retrieved February 16, 2018, from https://www.qualitymatters.org/
Wiggins, G., & McTighe, J. (2005). Understanding by design (2nd Expanded edition). Alexandria, VA: Assn. for Supervision & Curriculum Development.
How to cite this blog post:
Krause, D., Hitchcock, L.I., Sage, M., & Smyth, N.J. (2018, March 8). Course Mapping for Online Social Work Courses [Blog Post]. Retrieved from: https://laureliversonhitchcock.org/2018/03/08/course-mapping-for-online-social-work-courses/